
On Haggerty, High Knees, Cross Guards, and Pivots
Over the last couple of years, Yuki Yoza has made a habit of battering Thais. Kongnapa and Petchtanong are more well known for their kickboxing careers, but Petchdam and Superlek were Lumpinee stadium champions, and all found themselves on the wrong end of Yoza’s buzzsaw of Kyokushin offence. For those interested in the Karate vs Muay Thai angle, it was easy to enjoy, but more importantly Yoza’s style demonstrated that there is not really one “kicking range.” “Infighting with kicks” is the best way to describe how Yoza pushes his man’s weight onto one leg in order to kick it, or counters a kick by hacking at the standing leg underneath.
Fig. 1
Jonathan Haggerty’s style contained a great deal of traditional Muay Thai influence, and he appeared exclusively in Muay Thai rules matches until a couple of years ago. Heavy on the teep, the switch kick, and the elbows. Last week we covered how he used the last couple of years to find confidence in his hands and the adjustments he has made to his back-foot style in order to come forward with jabs and traditional boxing offence.
Having watched Yoza’s Vasileus Gym teammates lose to teeps and good spacing time and time again, it remained a major concern as he stepped in the ring with a man whose entire early career was built around the teep. Instead, Jonathan Haggerty took Yuki Yoza apart with the slickest boxing he has ever shown.
Haggerty’s gameplan was built around:
Intercepting Knees
Sidestepping and pivoting to either cut off exchanges or sneak extra blows in
Timing switches to southpaw
Intercepting Knees
Last weekend, Carlos Prates brought the stepping knee to lever against Jack Della Maddalena in a way that made it seems almost like a cheat code. The details of that matchup that made the knee particularly potent were that Della Madalena stands in a lower stance, likes to level change even in his striking, and goes to a high forearms guard when he is under fire.
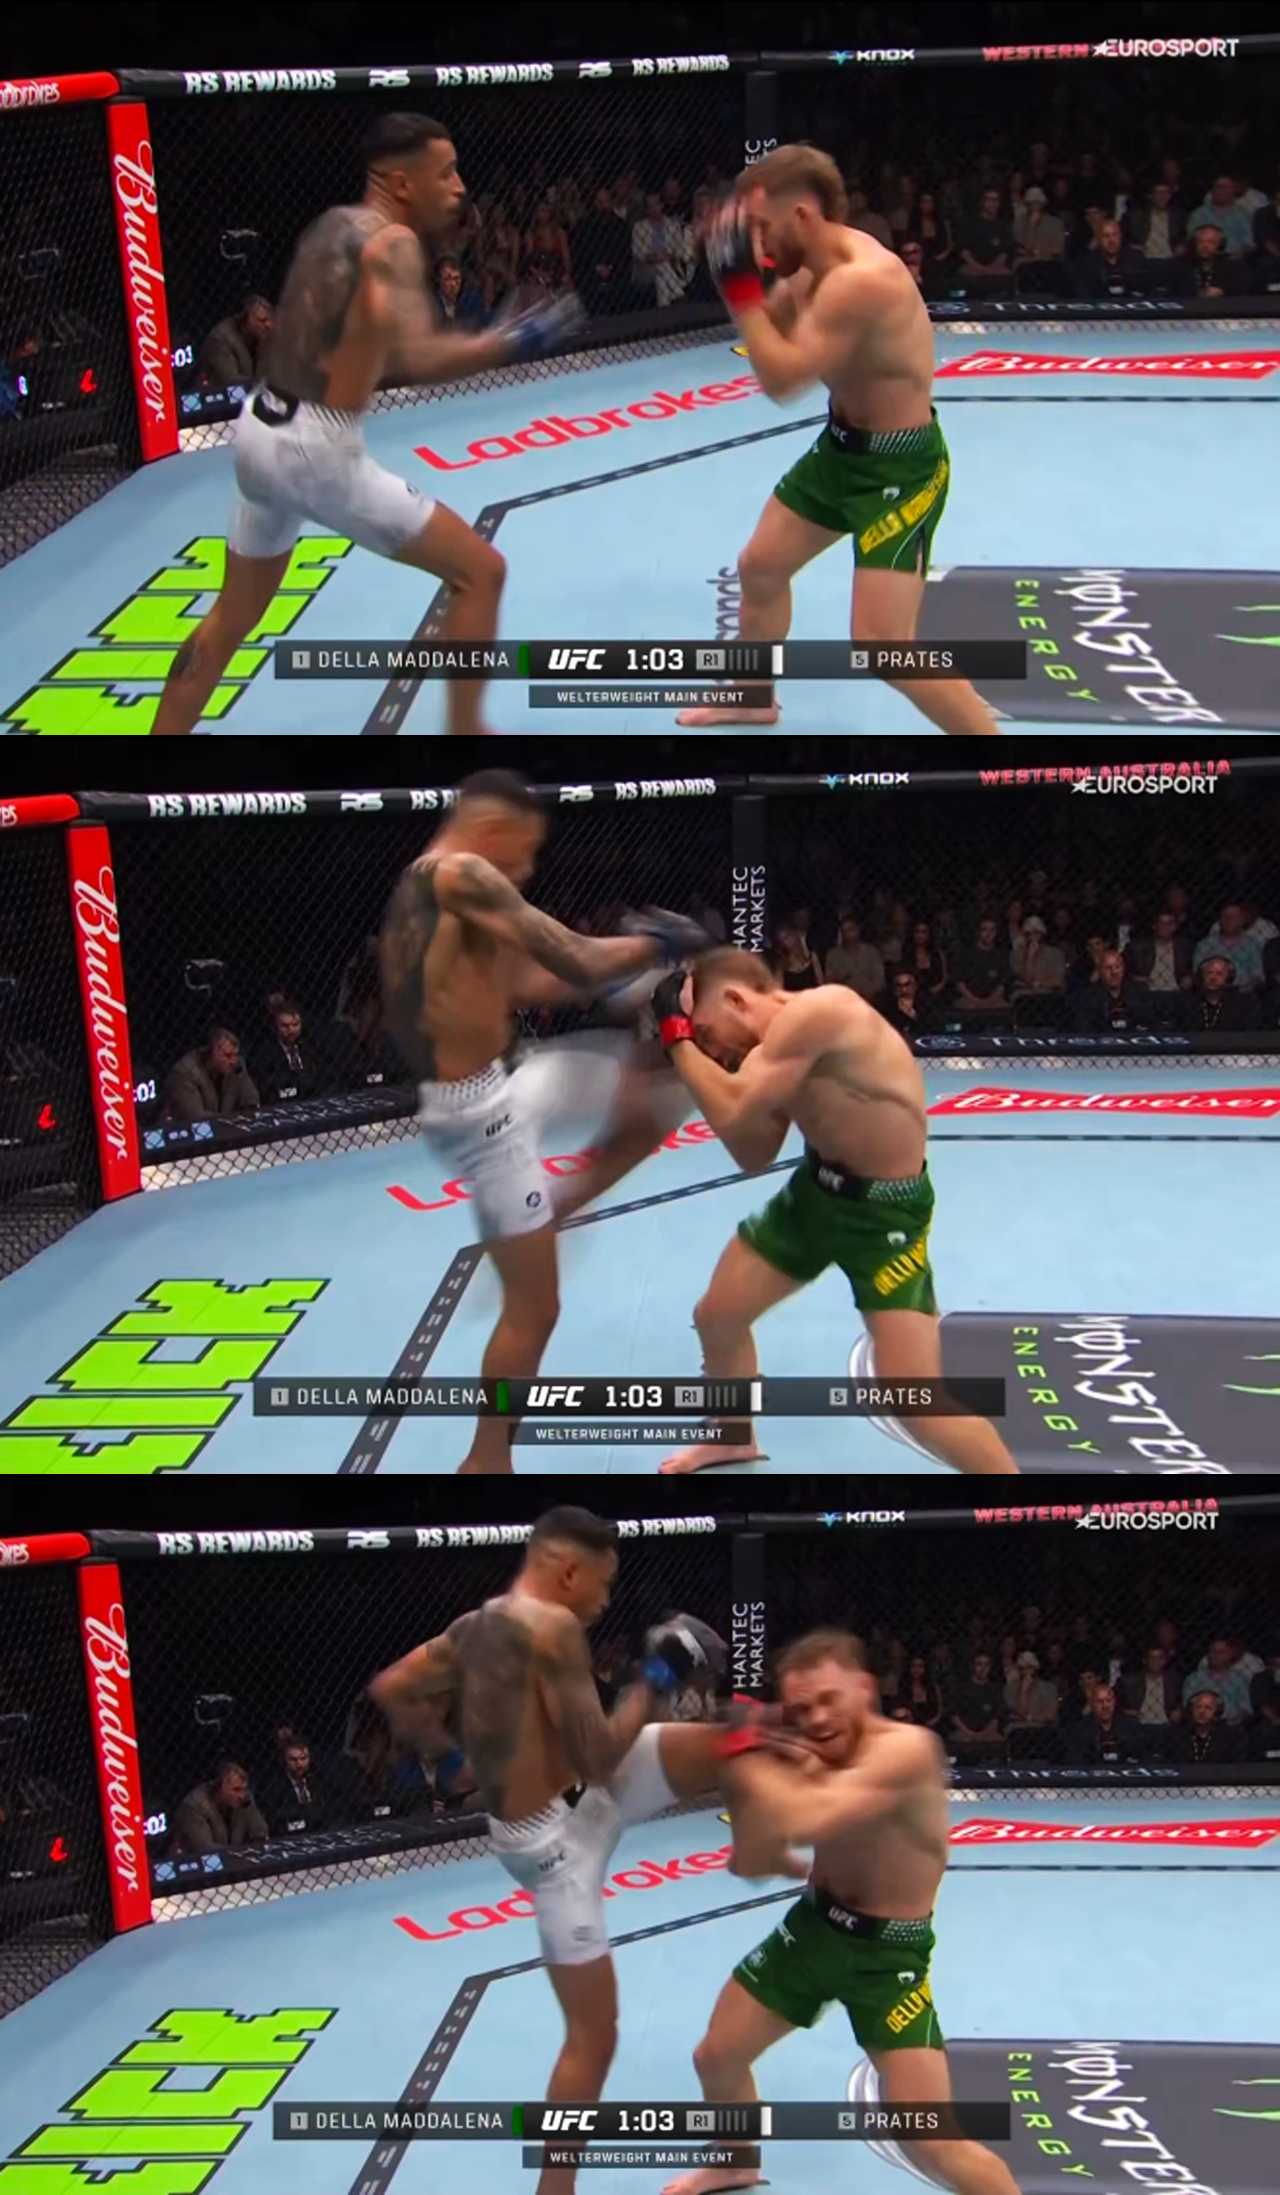
Fig. 2
It goes without saying that a height advantage is great to have when you want to throw stepping knees. Bringing your knee up to the height of your own chest is very easy, and throwing a decent stepping knee above the height of your own head is almost impossible. A couple of inches height disparity can gift one man sole ownership of the stepping knee. This is also true if one fighter strikes out of a crouched stance.
A stepping knee does not need to end in a clinch. That is why it is legal in kickboxing while kneeing from the clinch is not. But it is tremendously difficult, and in fact downright dangerous, to try to combination punch through a stepping knee. Thrown to intercept the opponent as he steps forward, it is incredibly easy to come down into a chest-to-chest position and stifle any follow up.
Jonathan Haggerty led Yuki Yoza around the ring, turning him and sticking him with punching combinations, and every second or third engagement he would meet Yoza with the knee. Yoza was forced to keep his hands at home, and until the final two rounds he did almost no punching at all.
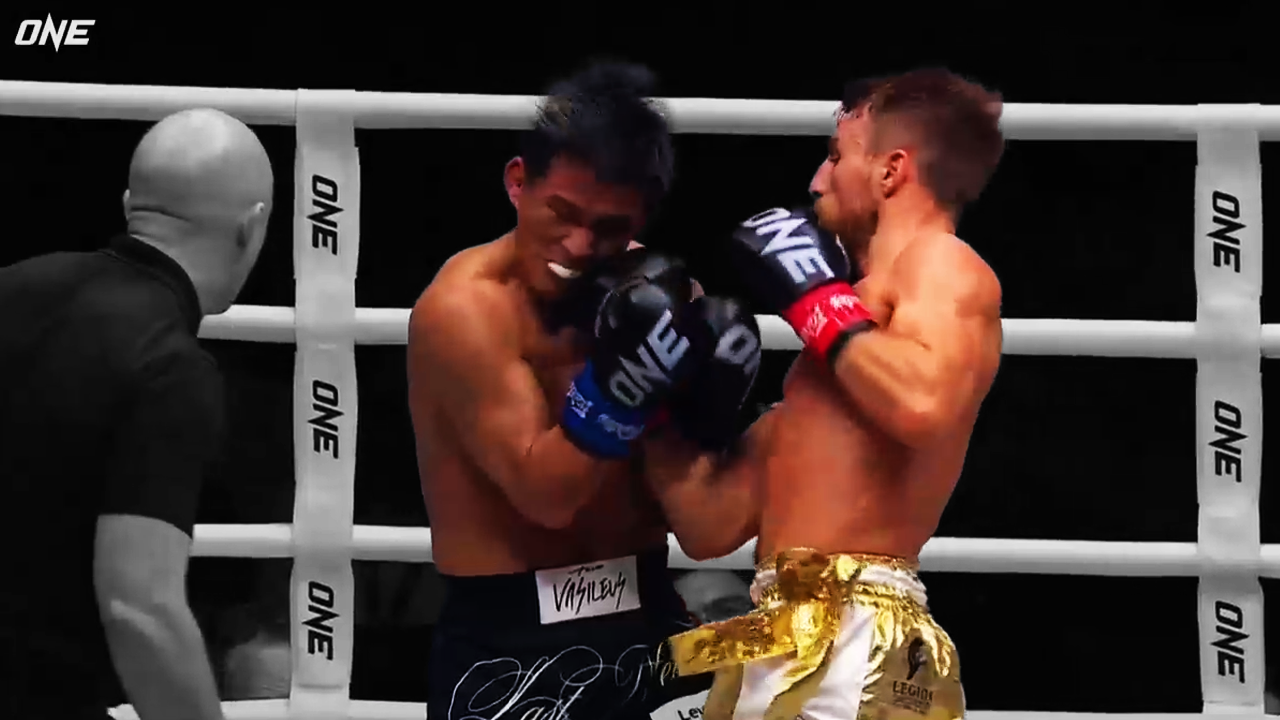
The stepping knee is not something that Yoza is unaccustomed to facing. His entire game is walking into the opponent’s chest, therefore he is very much at risk of a knee coming up the centre and knocking him out. In fact, he regularly uses a cross guard in anticipation of it. With his right hand on the bottom—the opposite of a traditional cross guard—Yoza creates a solid barrier through which the knee must pass to reach his head. Most often the thigh of the opponent connects with his forearm in the manner that you might cap the top of the knee when receiving one on a belly pad.
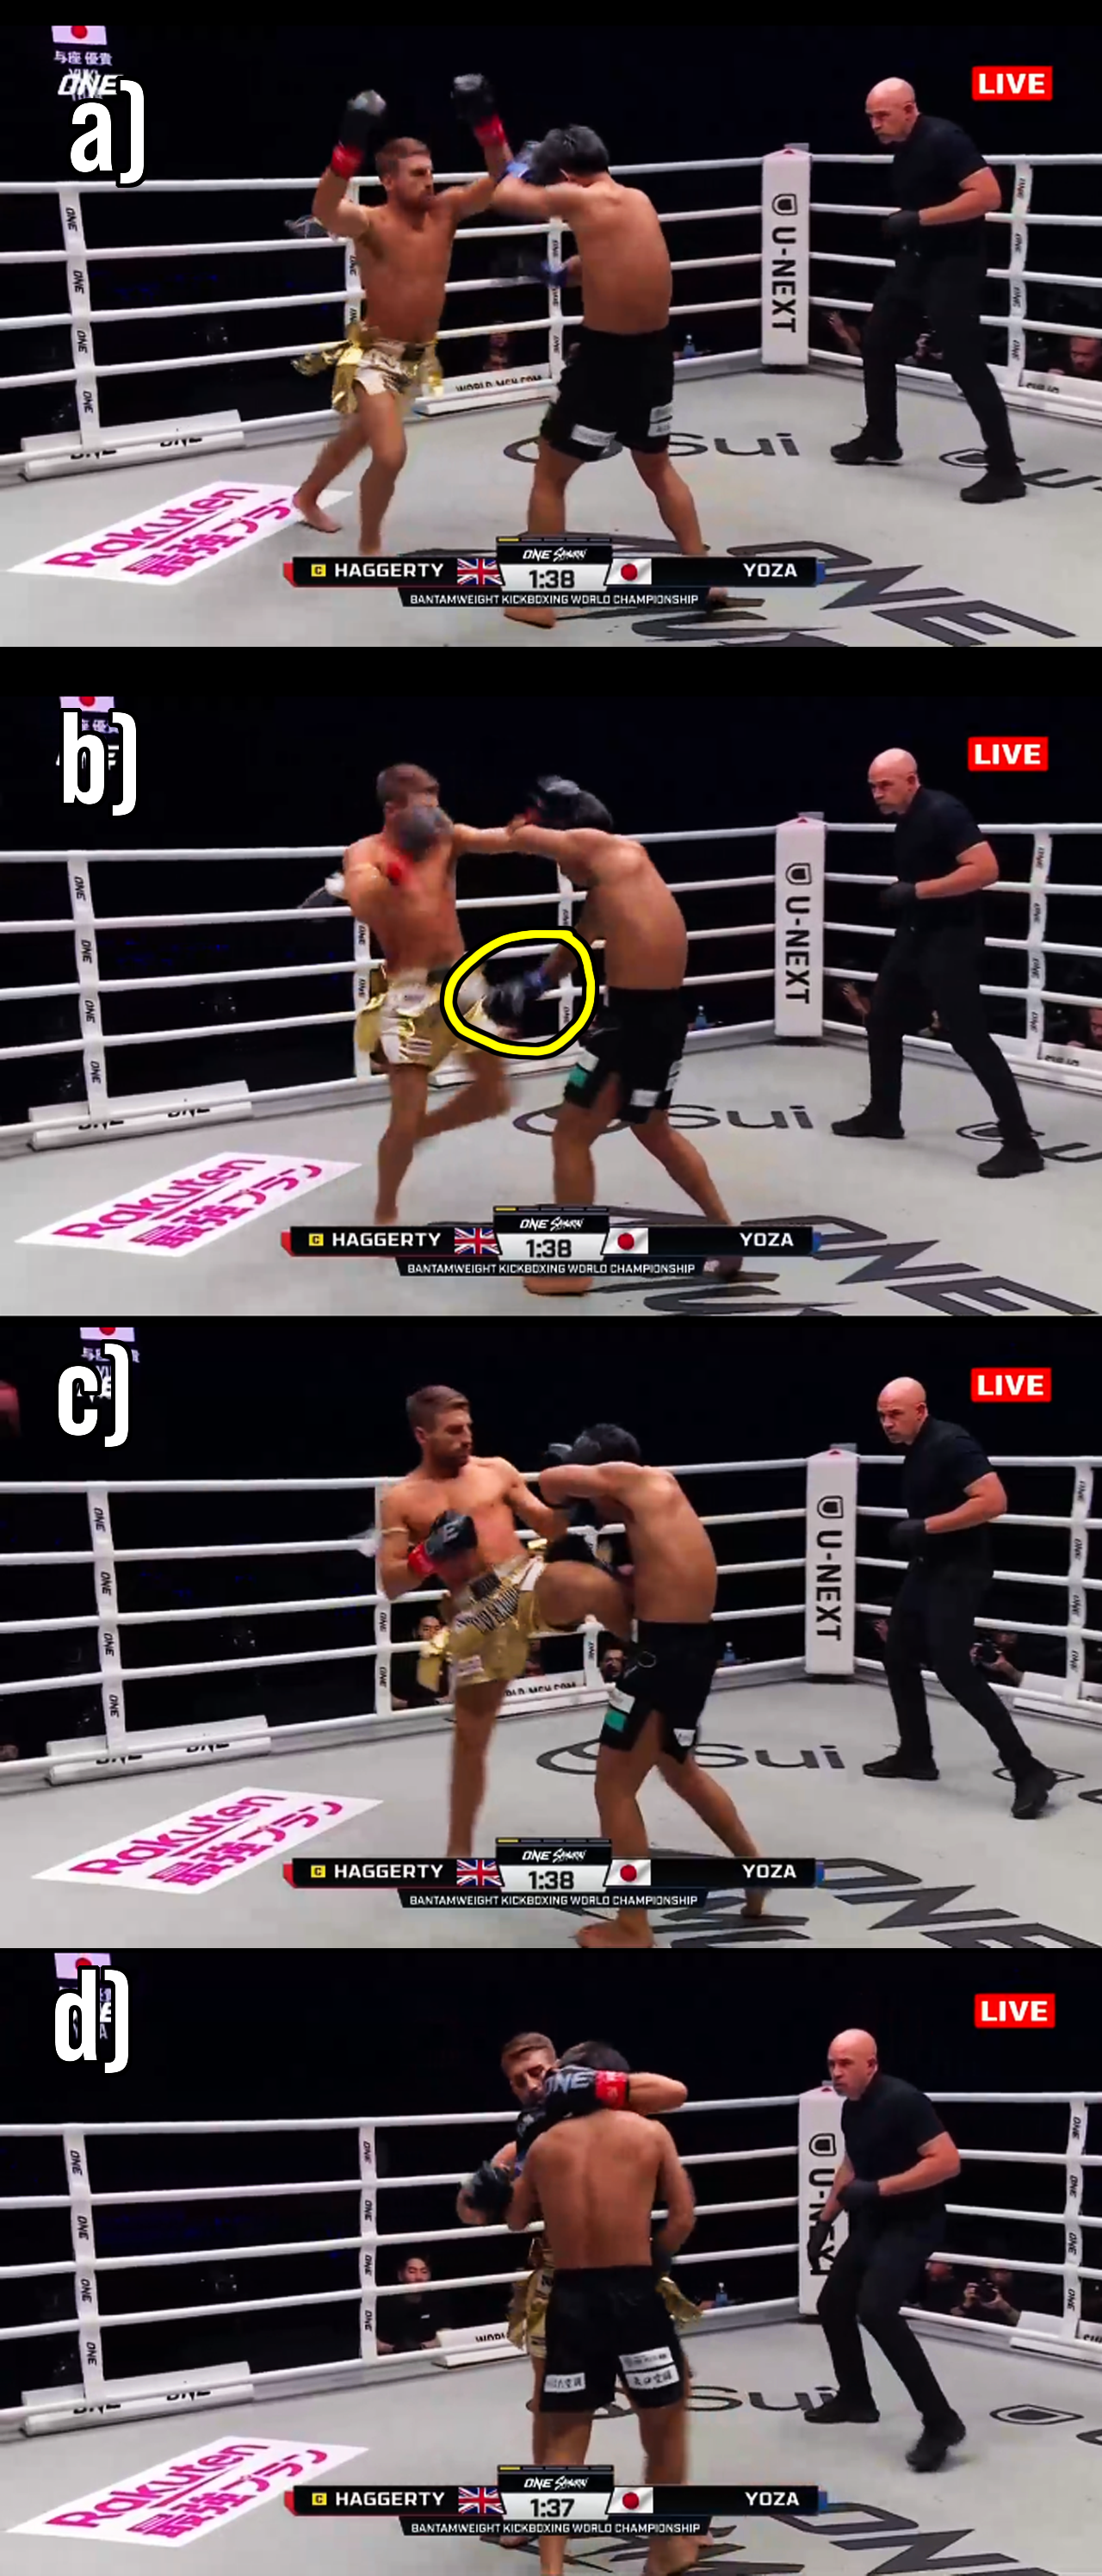
Fig. 3
An interesting point is that Yoza always has his right hand on the bottom, even when he is standing southpaw. This might be because the opponent’s right knee is what he sees most, and using his right forearm as a frame he can effectively parry it across the body and look to follow up.
An Aside on the Cross Guard
In boxing, the traditional cross guard carries the lead hand lower. There are three main benefits to that. The first is that the head is protected on the open side by the right upper arm and shoulder. Switch the hands over and you are taking the left hook on your left glove in a way that is unusual and cumbersome.
With that being said, it has been made to work. Gene Fullmer used an upside-down cross guard successfully, and fought thirty-five rounds with Sugar Ray Robinson, one of the greatest left hookers of all time. Though what Fullmer did was often more of a one handed folding guard: hiding in the crook of his left elbow while he loaded up his right hand. As Sugar Ray Robinson mentioned in his autobiography, Fullmer’s right hand to the body was the one that caught everyone out.
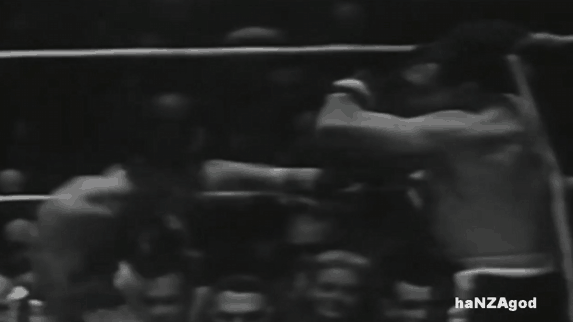
Fig. 4
Fullmer was often standing with his shoulders bladed, rather than square as in the traditional cross guard, which made the right hand the more natural counter. He did have a terrific left hook, but to use it out of his cross guard he had to drop the hand that was doing the majority of his covering.
Which brings us to the second reason the lead hand is traditionally held lower: the traditional cross guard is performed square-on. The left hook is the hand you naturally want to swing with out of a square position, so by carrying it lower you can drop it and throw without your right hand leaving its cross guarding position. Swinging the right hand from square-on is often unintuitive and will lack the power of the left hook. Joe Frazier’s entire game was bobbling his head has he cross guarded, and coming up swinging left hooks.
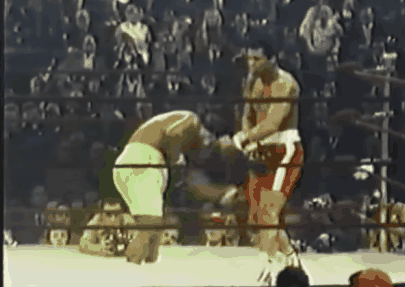
Fig. 5
Archie Moore demonstrates the third reason to have your lead hand lower. By blading the body and dropping the elbows, the fighter can turn the cross guard straight into the stonewall / shoulder roll position. The cross guard loads up the counter left hook, the shoulder roll loads up the counter right hand. Moore was one of the few fighters who was fluent in both systems of counterpunching and could flow between them to maximum effect.
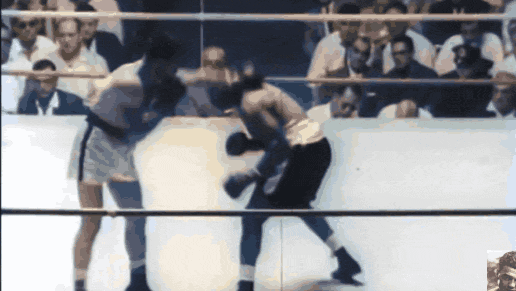
Fig. 6
To return to Yuki Yoza’s use of the cross guard, it mainly enables him to get hands on the opponent and begin pushing them off balance in order to hammer them with low kicks again. Almost all of his best punching is done with his left hand, which means that when he wants to return off his cross guard, he cannot just drop his left hand through the bottom of his guard, but rather has to unwrap the position first. It’s pretty cumbersome but he still catches many of his opponents off guard because the cross guard is so unusual in kickboxing.
Fig. 7
Throughout the Haggerty fight, Yoza was able to avoid being hit in the head by the stepping knee. But this did little to prevent Haggerty from arcing the knee around the side a little and hitting his body. Blocked or landed, the knee still had the intended effect: Yoza was broken off mid-attack, and then smothered. Notice here that Yoza takes the knee to the ribs, then has to uncross his hands into his regular guard, before he can comfortably return with the left hook.
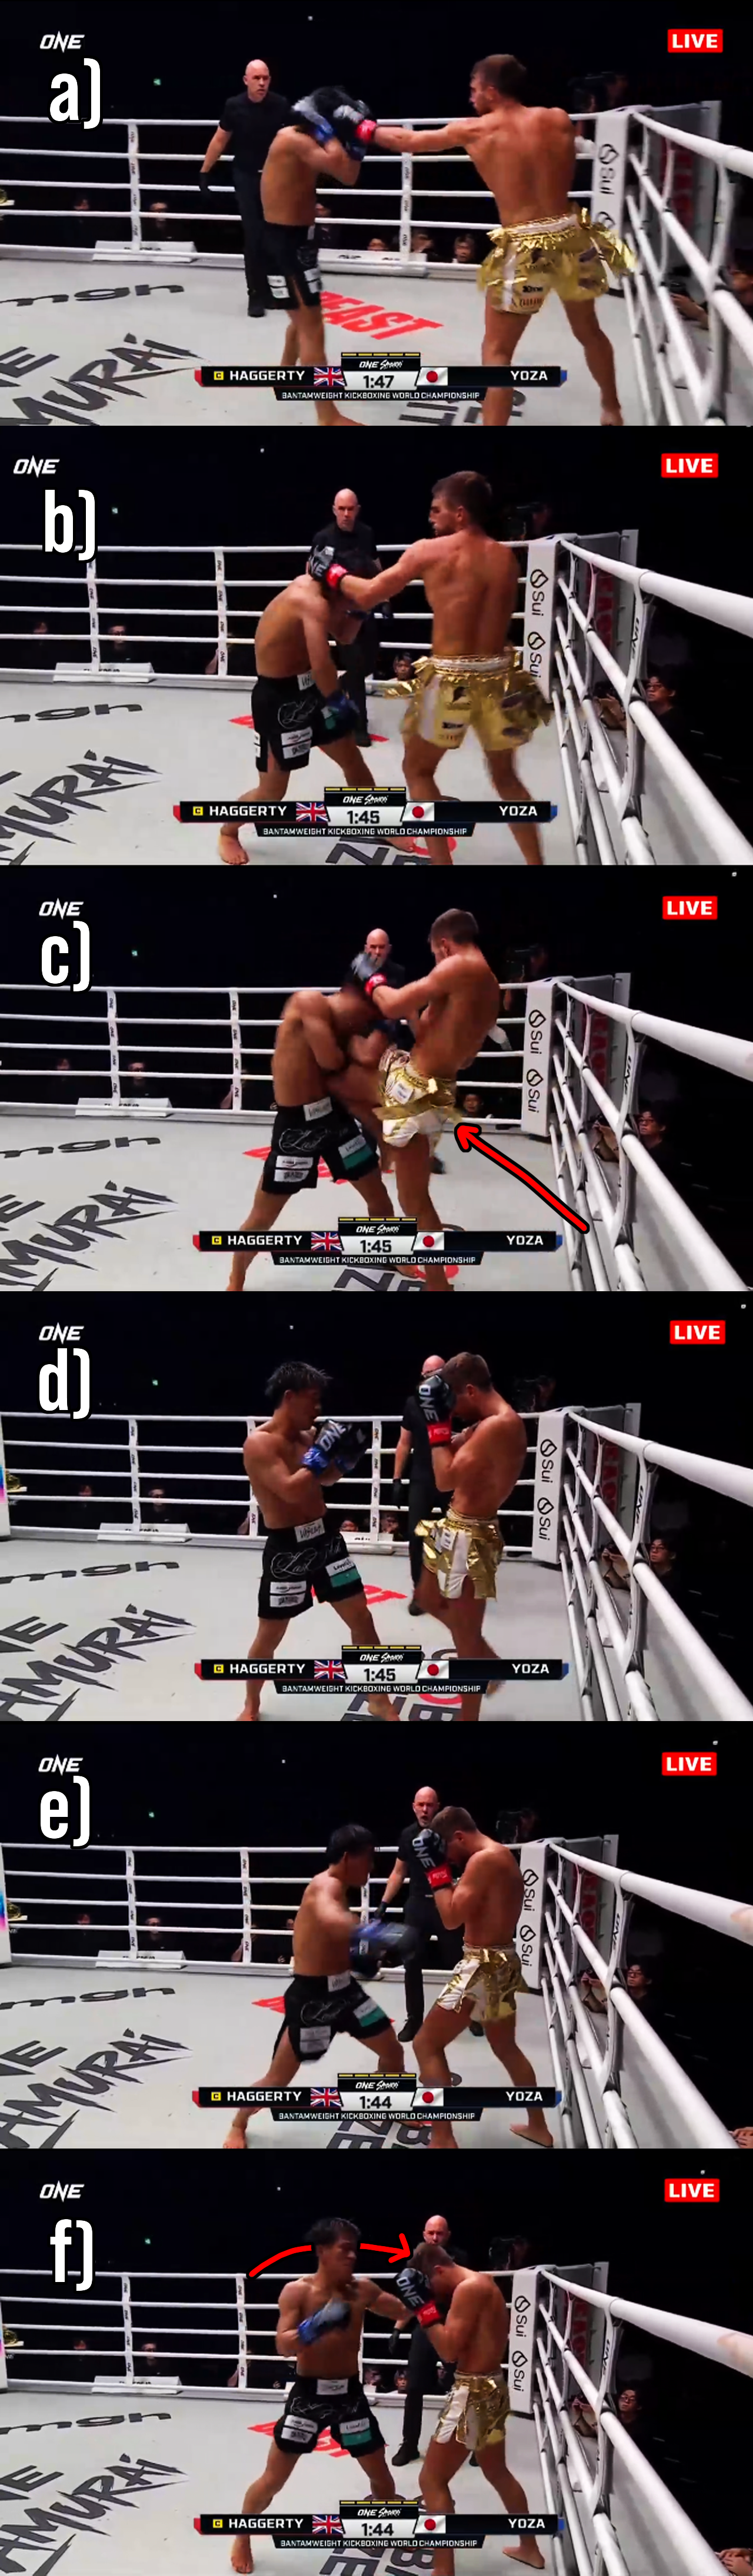
Fig. 8
Pivots and Sidesteps
The stepping knee was a way of taking the bull by the horns. Often it killed Yoza’s attack, but sometimes Haggerty would score the knee and Yoza would absorb it and open up before Haggerty could hold him. The best part of Haggerty’s work to cut off Yoza’s offence was done with his feet in the form of pivots and sidesteps.
Figure 9 shows a typical example. Haggerty steps back into a southpaw stance (b), then steps forward (c) and into a right knee to the body (d). As Haggerty comes down from the knee, he pivots out around his left foot (e). Yoza has thrown a kick at Haggerty’s back leg and completely misses as that leg swings around behind Haggerty.
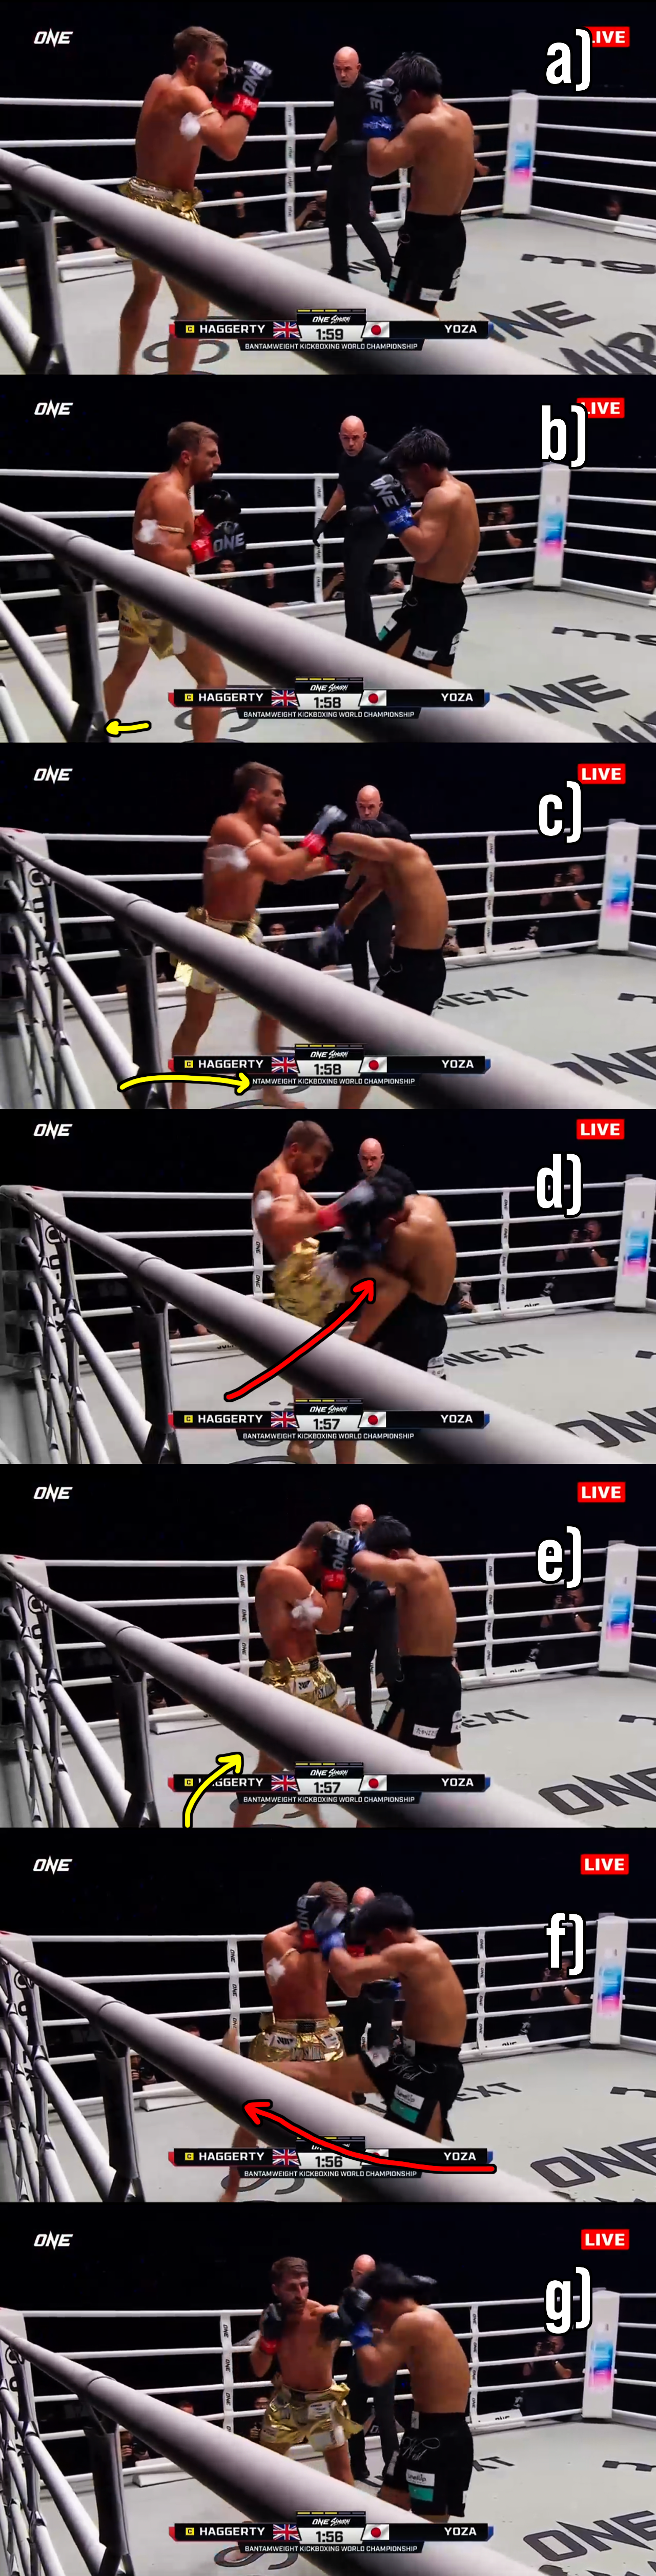
Fig. 9
Because both men were switching stances constantly throughout the fight, there isn’t much point talking about pivoting left or right or clockwise or anti-clockwise. The main distinction is whether Haggerty was able to slide down the back of Yoza’s stance, or to create distance or stay in tight. Figure 10 shows an example of the latter. Yoza leads with a long low kick, which Haggerty checks (b). Haggerty scores a one-two (c), (d).
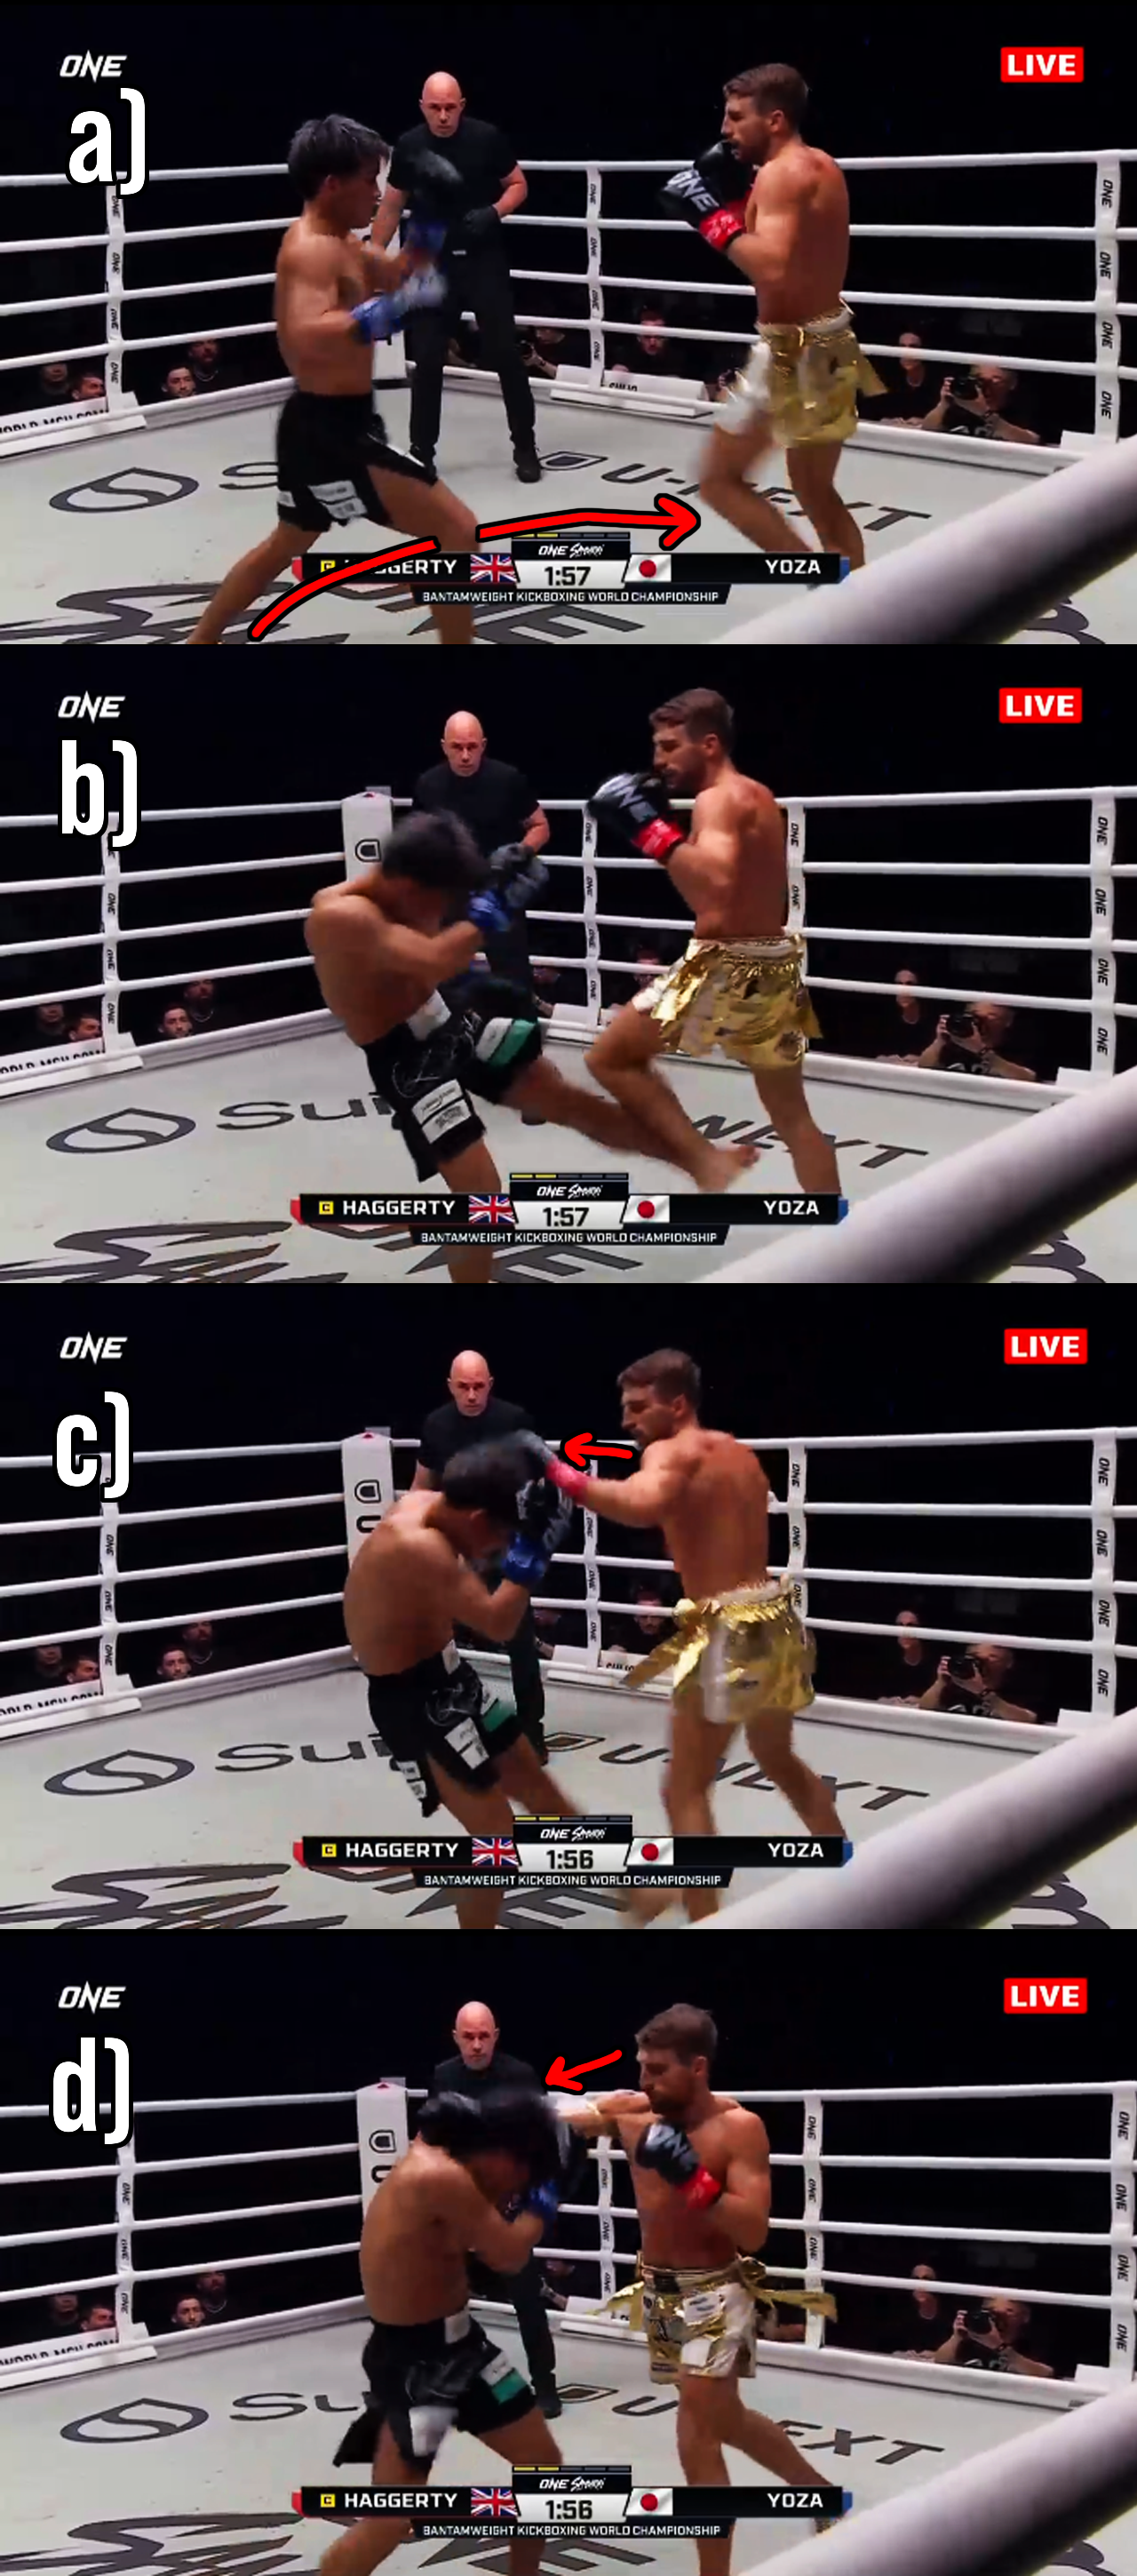
Fig. 10
Figure 11 continues the action as Haggerty frames on Yoza with a reverse collar tie and pivots to his right (e), before unleashing an uppercut as Yoza turns to face him (f).
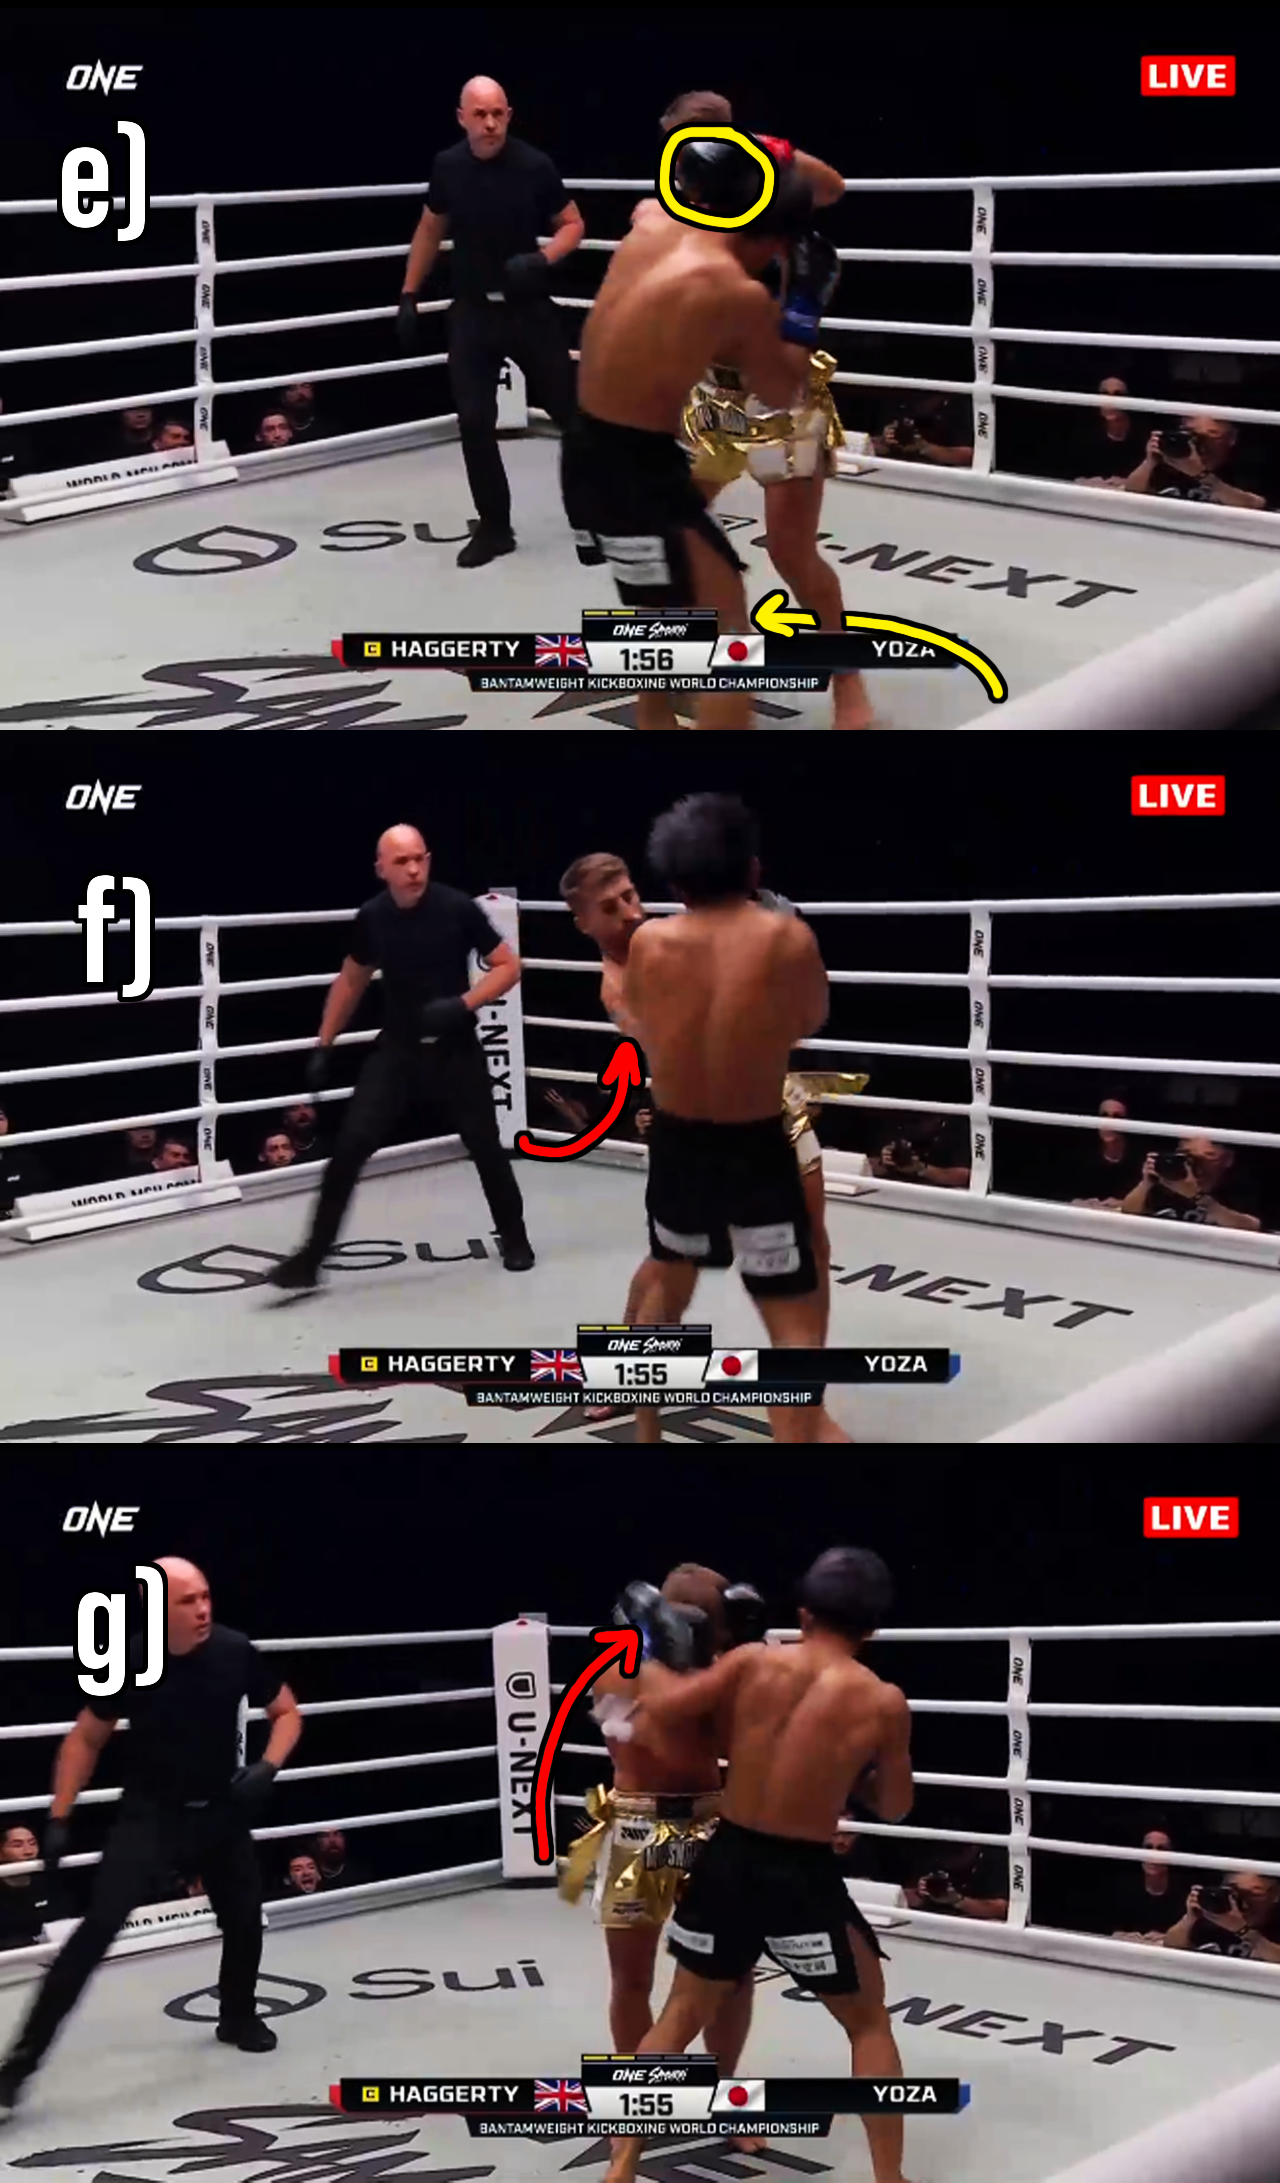
Fig. 11
This is an example of the pivot enabling Haggerty to get off more offence, and more often he was pivoting the other way around Yoza, doubling up on left hooks. You will notice that while Haggerty used his pivot to land a corker of an uppercut, Yoza immediately returns with a left hook because Haggerty is still in the firing line (g).
For the most part, Haggerty was using his pivots to escape exchanging range and force Yoza to turn and reset. Figure 12 shows Haggerty step back to southpaw (a), (b). He slaps a right hand on the outside of Yoza’s left glove, as he steps out with his right foot (c). Rather than pivoting and staying tight to Yoza, Haggerty slides his left foot up to his right to perform a sidestep out to the right (d), landing in orthodox stance again (e).
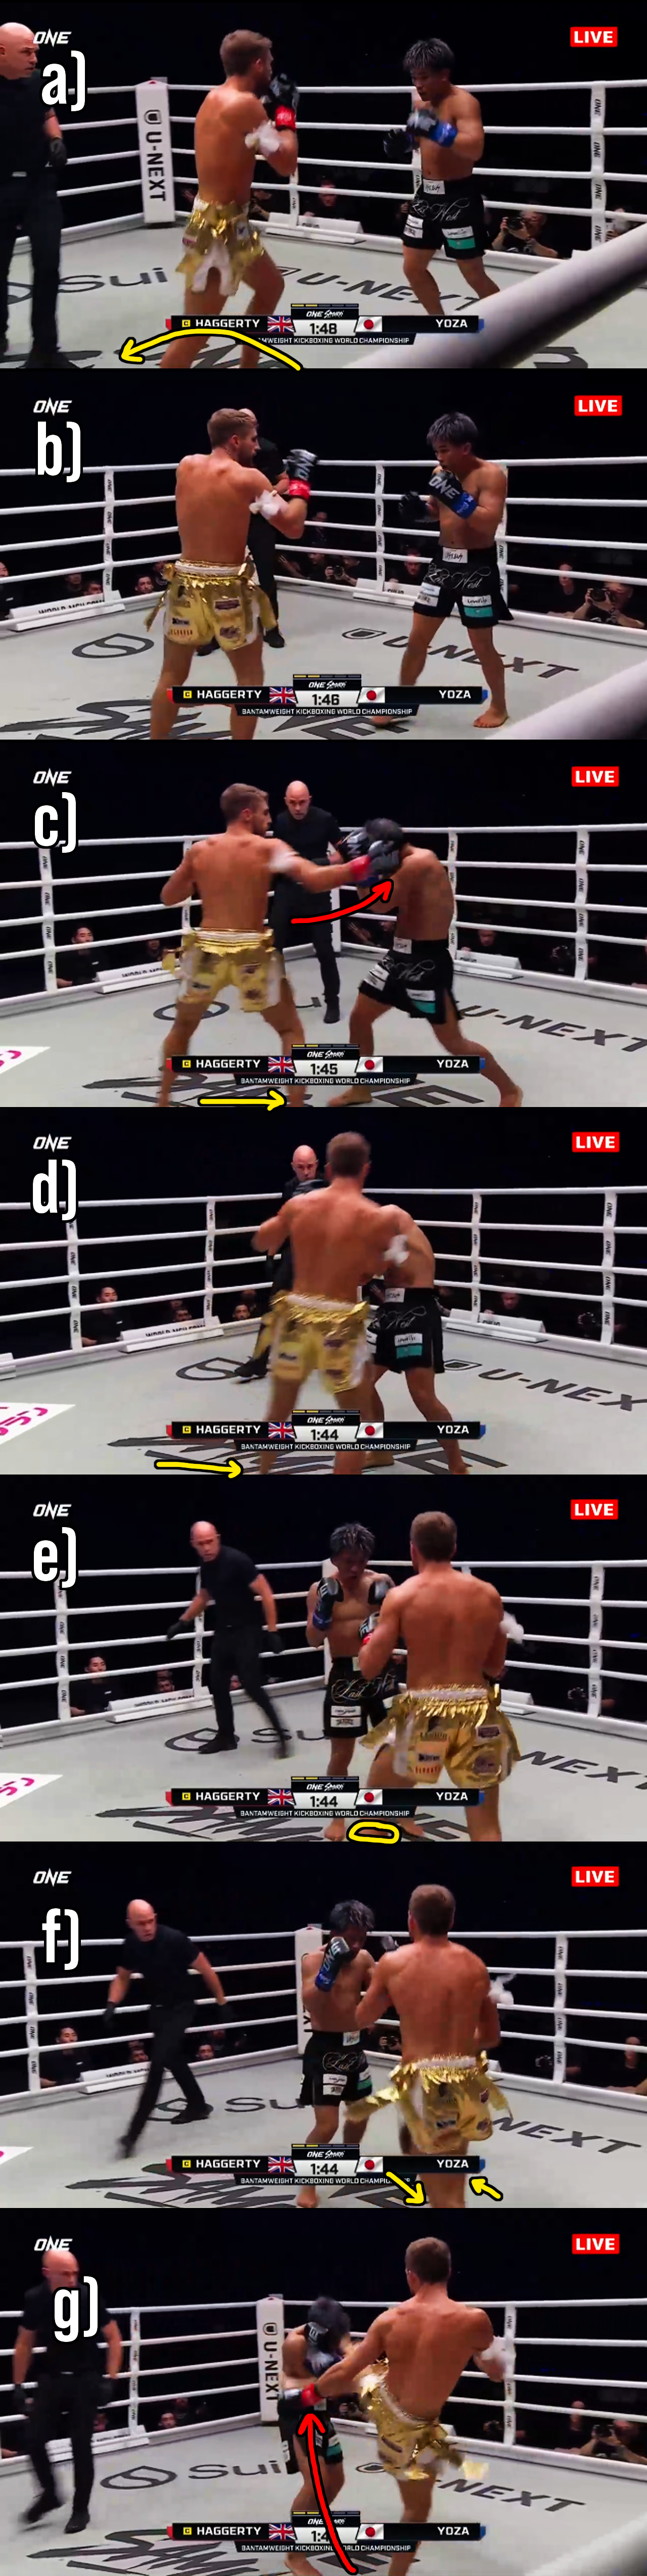
Fig. 12
Yoza pivots and follows, because he must if he hopes to get to his range, and Haggerty hits a switch step (f) into a left body kick (g). This was only possible because he created a good amount of distance on the angle change, so that he could time Yoza turning through it.
On the opposite extreme, there were times when Yoza was on top of Haggerty before he could get his straights punches off. Figure 13 shows Yoza walking in with his earmuffs on and Haggerty using his hands to slap Yoza’s raised gloves (d) and pass him under the armpit, matador style (e), (f).
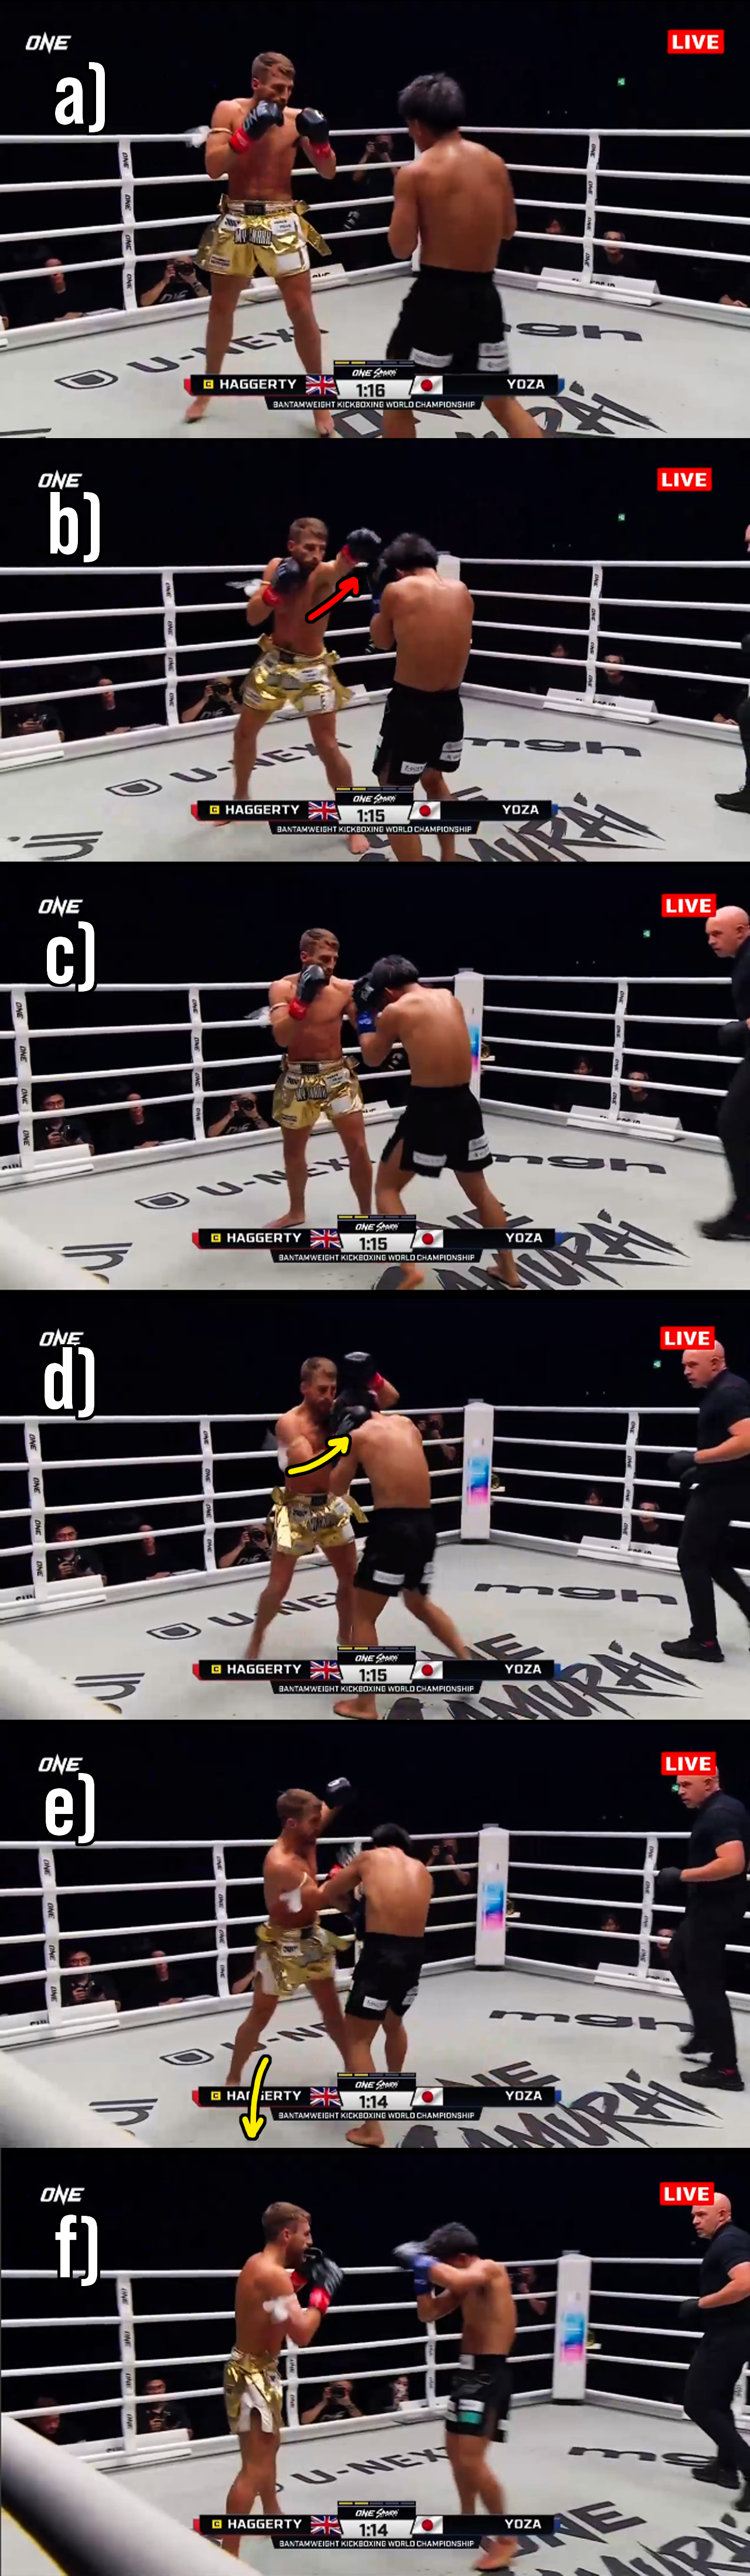
Fig. 13
Switches to Southpaw
As we discussed in our last Haggerty article, switching to southpaw has always been a large part of his game. He does not pretend to bring the same threat off each stance, but instead uses his southpaw stance to kick, and to set up his steps back through to orthodox—where he does all of his serious hitting.
An emphasis on mobility allowed Haggerty to bring his southpaw stance to lever in a new way in this fight. Haggerty would often look to find an open stance match up and then skip towards the back side of Yoza’s stance, sliding down the outside of his lead foot.
Figure 14 shows Haggerty take a big shift back into southpaw (b), then slap in a right hook to check Yoza’s left glove (c), before stepping down the outside of his lead foot. Instead of pivoting around, Haggerty once again skips his left foot up to replace his right and assumes an orthodox stance on his new angle at a greater distance (d), (e), (f).
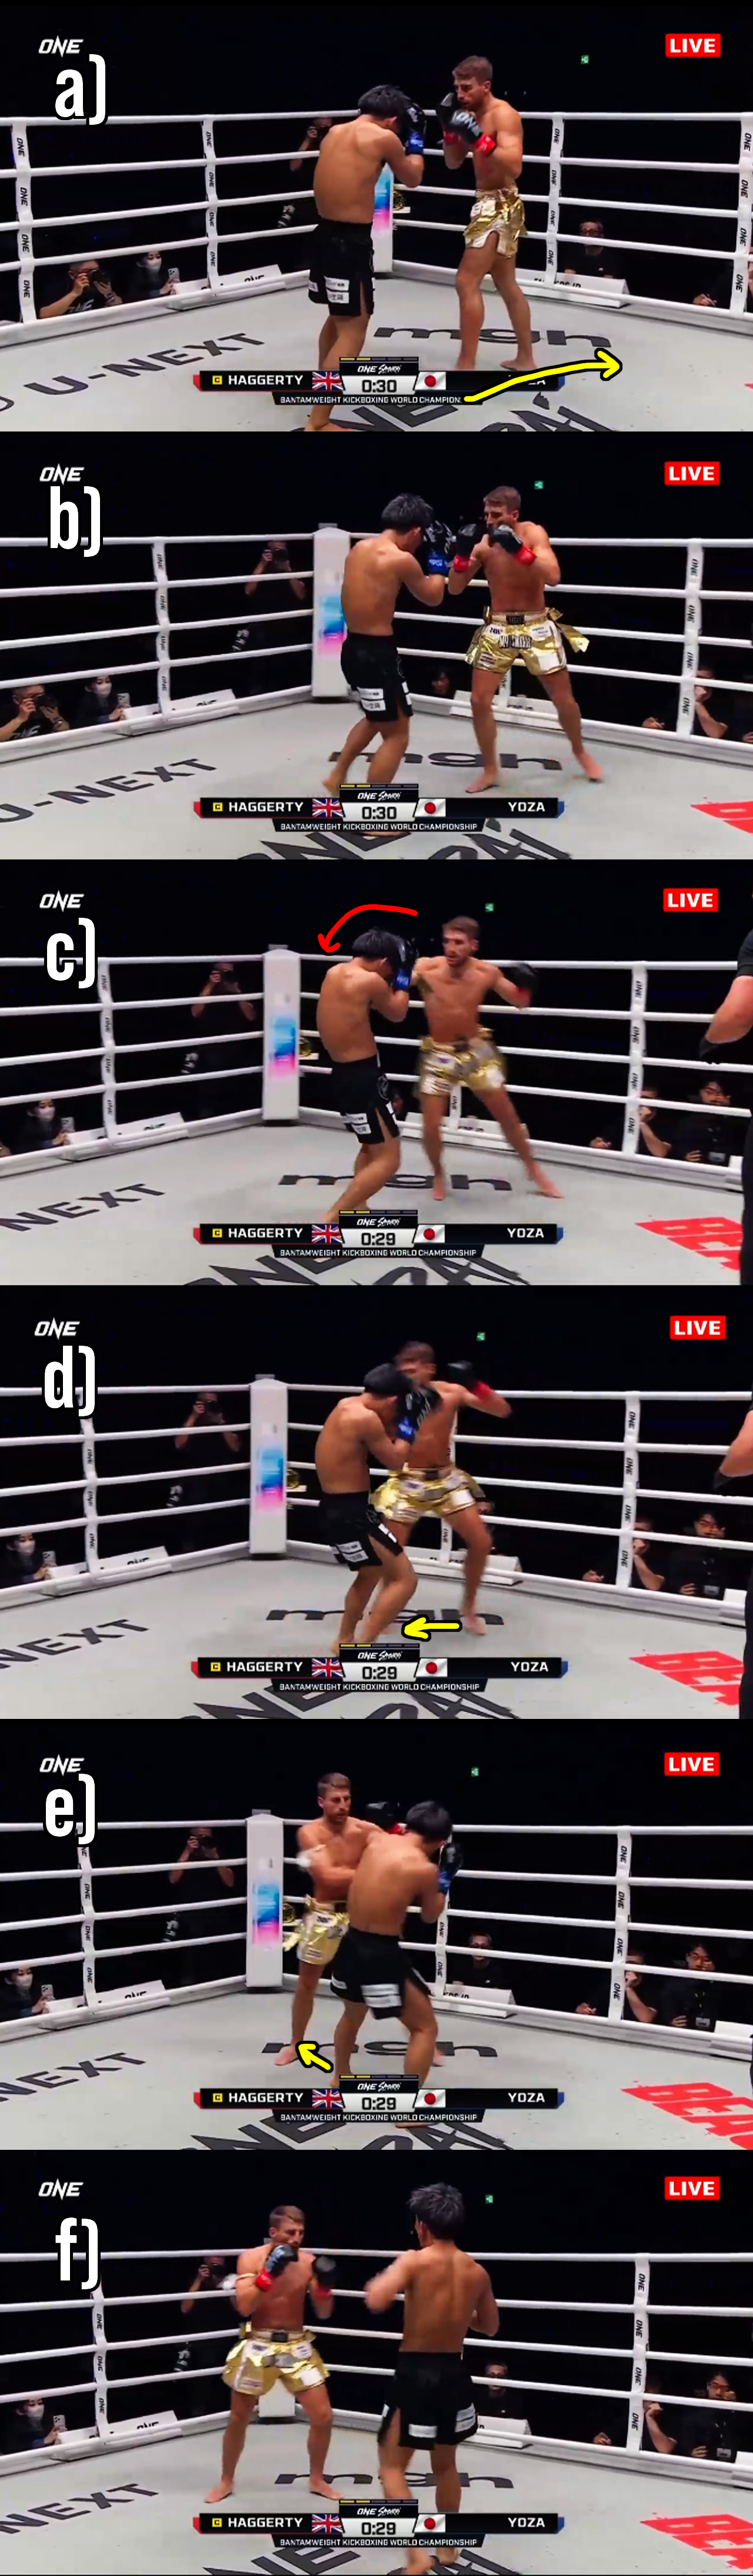
Fig. 14
Throughout the fight, Haggerty would clip off a couple of punches, sidestep or pivot, and then take a full step back into southpaw. Curiously this step back with a full change of stance is what was called the “shift” in early pugilism. In contemporary striking, we view a shift as an offensive movement: punching and changing stances as you advance, however the retreating shift was one of the first defensive developments outside of blocking and was apparently not well received by crowds, who treated it as an act of cowardice. You will still see the odd streetfight clip where one untrained participant naturally gravitates to a full step retreat when under fire, then has to take a full step back in to try and land a punch.
It is funny that a technique can be largely worthless in most fights, but specifically suited to dealing with such a high level opponent. A retreating shift might be a terrible decision against an opponent who is going to run you down with punches, or who has had the secrets of the double jab whispered to him, but it is wonderful against an opponent who is going to wholeheartedly throw himself into the low kick the instant he sees the chance.
In Figure 15, Haggerty is already southpaw, and so is Yoza (a). Yoza lashes out with a low kick, and Haggerty takes a full step back into orthodox stance (b), (c). Yoza is still getting his balance as Haggerty bounces in with a one-two (d), (e).
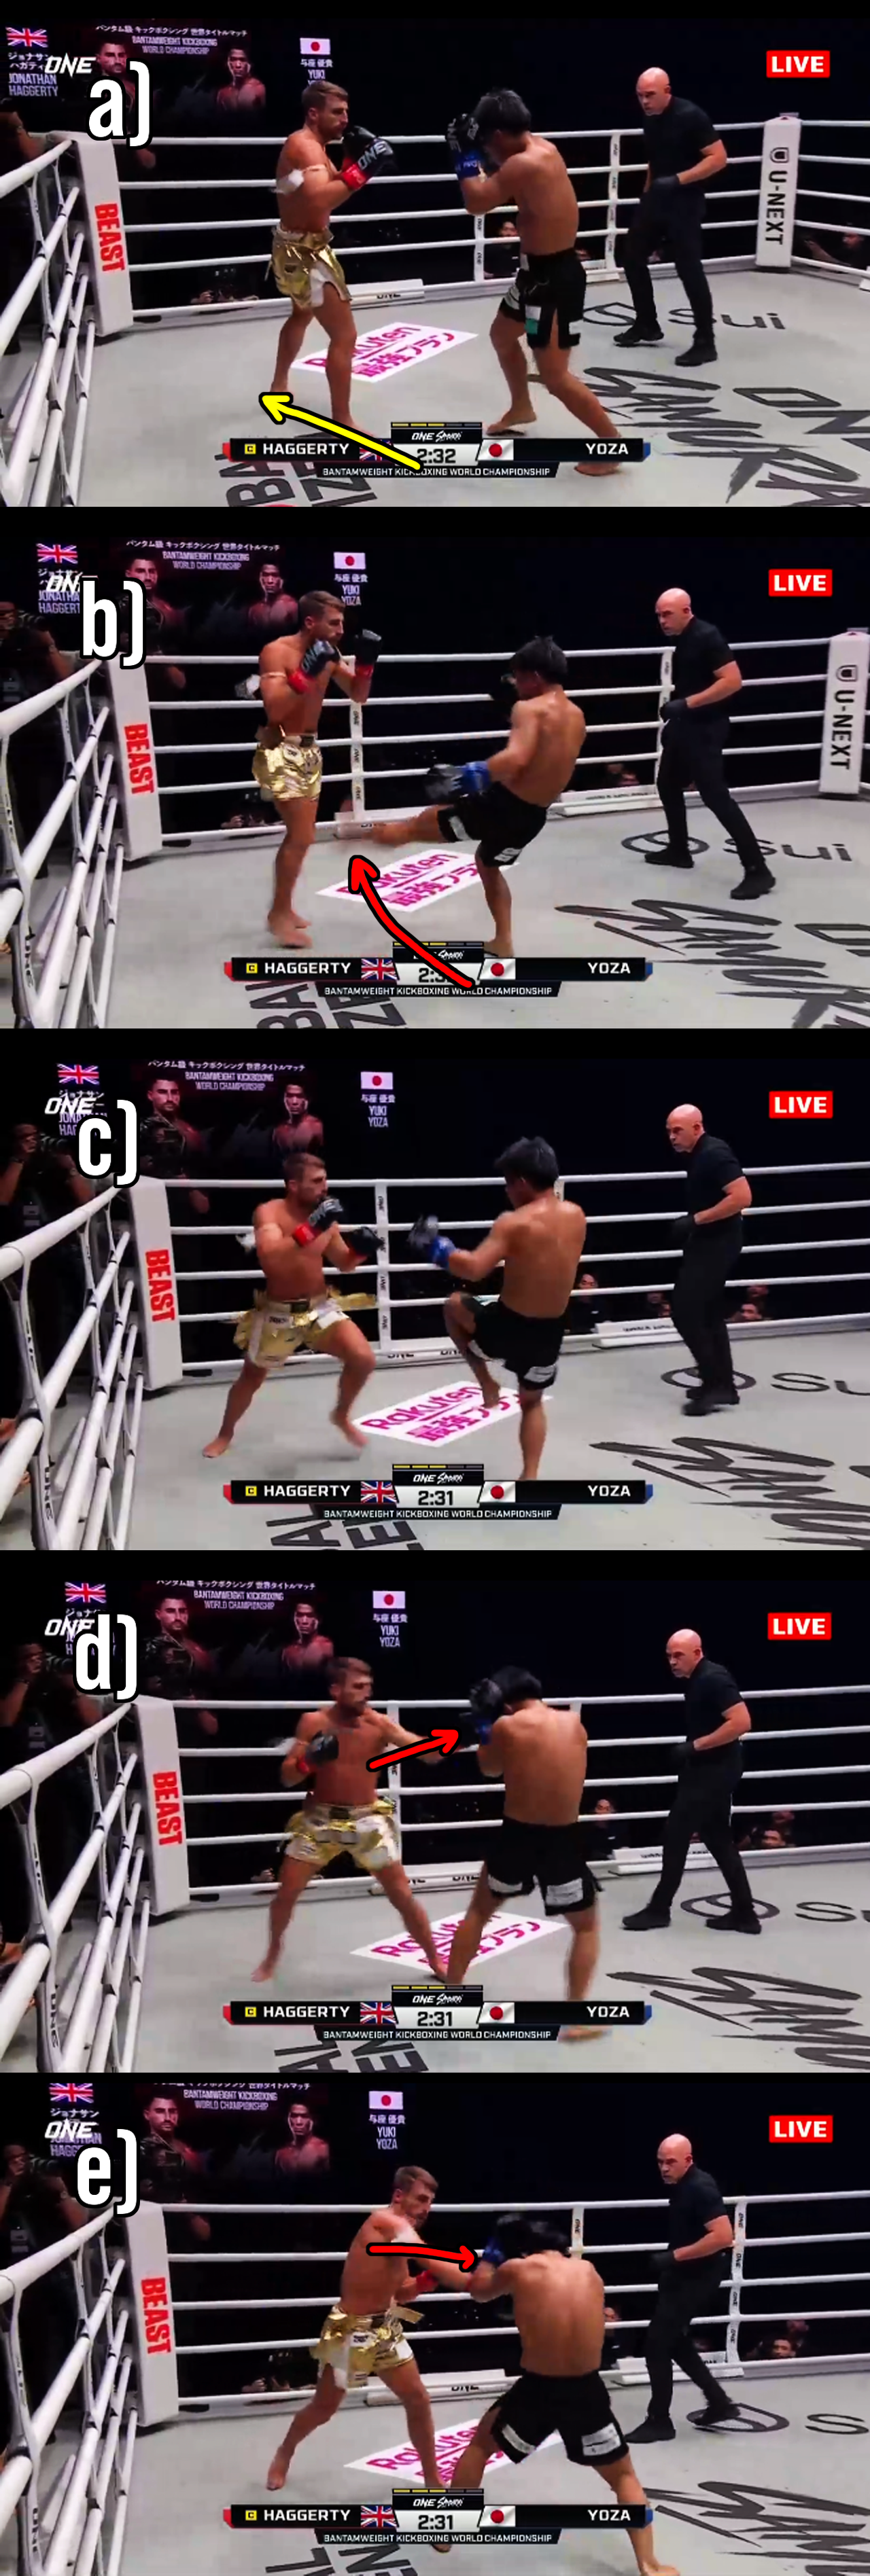
Fig. 15
Figure 16 shows a similar situation. Yoza is pursuing Haggerty and swings a low kick way out ahead of him (b). Haggerty withdraws his leg behind him into southpaw stance (c), before stepping back in (d) and landing another right knee to the body (e).

Fig. 16
Figure 17 shows a beautiful example of Haggerty putting it all together. He checks a low kick (b), scores his left hook and pivots out to his left (c), (d), and as Yoza turns to try to low kick again, he retreats a full step to southpaw (e), (f), (g).
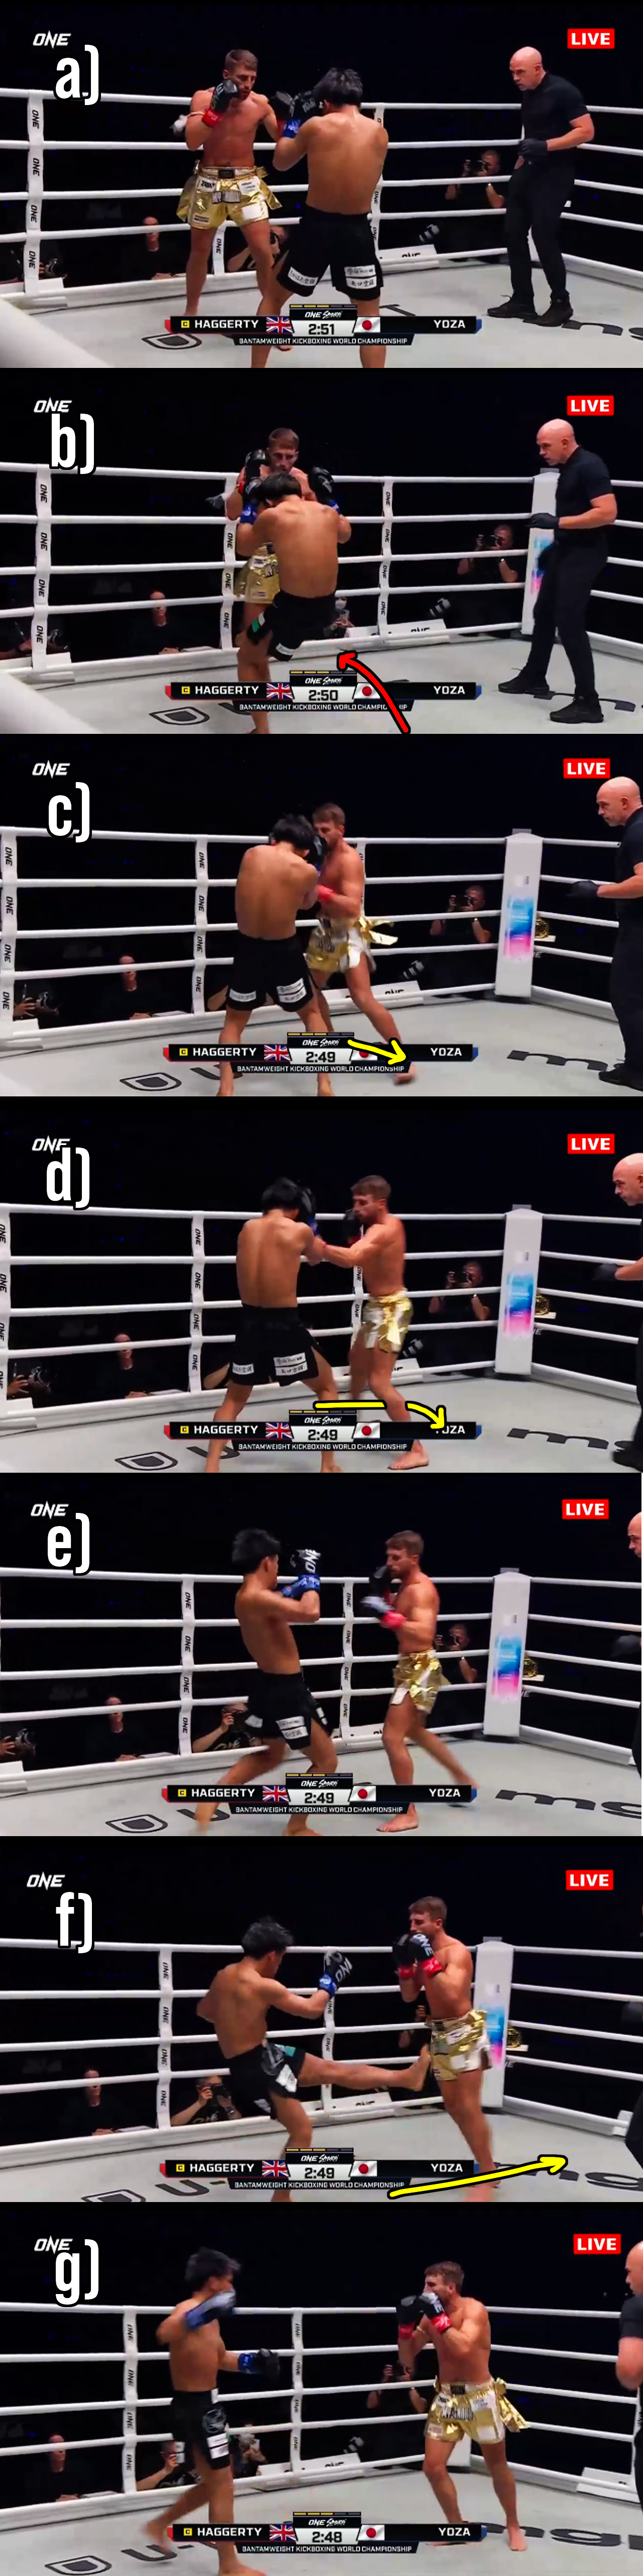
Fig. 17
This match showed the other side of low kicking. Traditionally low kicking has been a great answer to mobility because when a fighter is pivoting and side stepping, he is not capable of checking. Taking low kicks while in poor position to receive them quickly wears on a fighter and he either slows down from damage, or because he begins checking—which he must stand on one foot to do.
In a complete reversal of the natural order, Jonathan Haggerty used sidesteps and pivots to protect himself from low kicks. Not by going out there and running around the ring haphazardly, but by checking when he needed to, occupying Yoza’s hands with combination punching and knees, and then turning him. And any time Yoza began to land low kicks, Haggerty would withdraw the lead leg let Yoza get horribly out of position.
Yoza’s focus on the back leg has been a nightmare for many of his opponents. They are simply not used to having that leg targeted. From defence to physical hardiness, they just have not had cause to get the repetitions in. Yet the downsides of kicking the back leg have always been there, and watching Yoza whiff his infamous Yoza kick as Haggerty pivoted around the lead leg was an eye opener and a reminder that even when a technique seems devastatingly effective against the current crop of fighters, the answer is just around the corner.